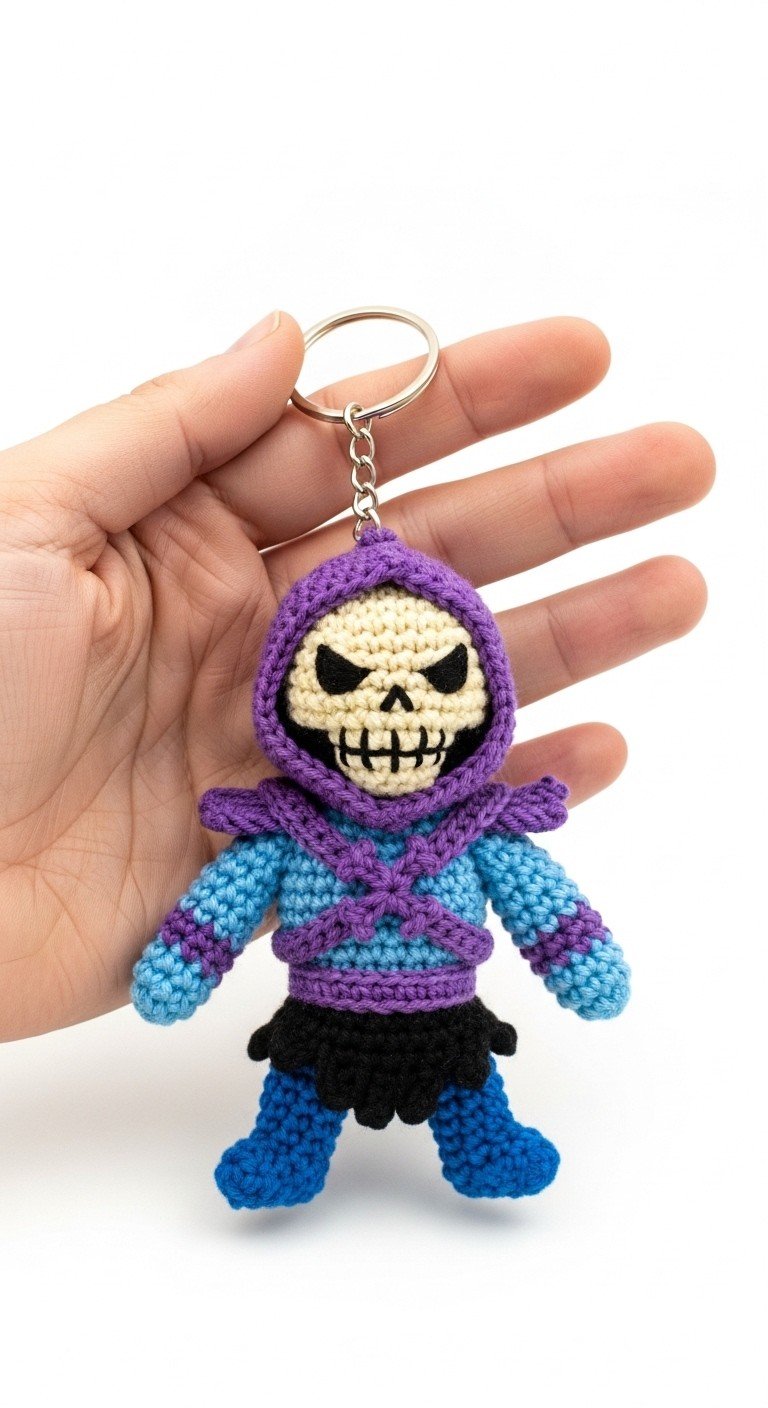
Summon the power of Grayskull and bring the infamous Lord of Destruction to life with this detailed Skeletor amigurumi keychain pattern! Perfect for fans of Masters of the Universe, this mini villain makes a fantastic accessory for your keys or bag. Crafted with love, he’s a unique way to show off your fandom.
Why Every Fan Needs a Crocheted Skeletor
Handmade keychains offer a special charm that mass-produced items simply can’t match. This Skeletor project isn’t just about crafting; it’s about creating a tangible piece of nostalgia. Whether it’s a gift for a fellow MOTU enthusiast or a treat for yourself, this little Skeletor will definitely spark conversations and bring a smile.
Crochet Pattern: Master the Universe! Crochet Your Own Skeletor Amigurumi Keychain Pattern
Materials
Worsted weight yarn in Cream (for head)
Worsted weight yarn in Black (for face details & skirt)
Worsted weight yarn in Dark Purple (for hood, straps, belt, stripes)
Worsted weight yarn in Light Blue (for body, arms, stripes)
Worsted weight yarn in Dark Blue (for boots)
2.5mm or 3.0mm crochet hook (or size suitable for yarn)
Fiberfill for stuffing
Yarn needle
Stitch markers (optional but recommended)
Keychain ring
Abbreviations
MR: Magic Ring
ch: Chain
sc: Single Crochet
inc: Increase (2 sc in one stitch)
dec: Decrease (sc 2 stitches together)
sl st: Slip Stitch
FO: Fasten Off
BLO: Back Loop Only
R: Round/Row
Instructions
Head (Cream Yarn)
R1: 6 sc in MR (6)
R2: 6 inc (12)
R3: (1 sc, inc) x6 (18)
R4: (2 sc, inc) x6 (24)
R5-R8: Sc in each stitch around (4 rounds, 24 sts)
R9: (2 sc, dec) x6 (18)
R10: (1 sc, dec) x6 (12)
Stuff firmly.
R11: 6 dec (6)
FO, leaving a long tail for closing the hole and attaching. Close the remaining hole.
Face Details (Black Yarn)
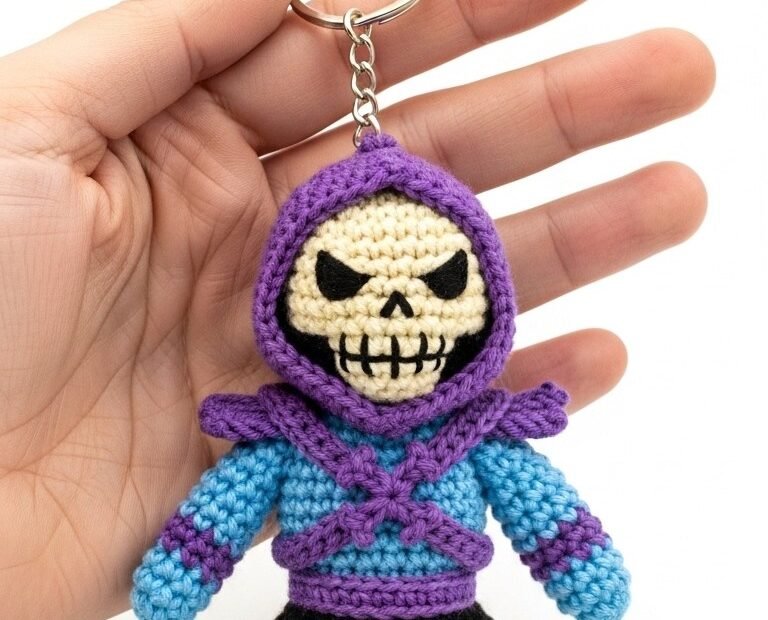
Using black yarn and a yarn needle, embroider the eye sockets, nose, and mouth onto the head according to the image.
Hood (Dark Purple Yarn)
Ch 20.
R1: Sc in 2nd ch from hook and in each ch across. Ch 1, turn. (19 sc)
R2-R8: Sc in each sc across. Ch 1, turn. (19 sc per row)
FO, leaving a long tail. Fold the piece in half and sew the back seam to form the hood.
Body (Light Blue & Dark Purple Yarn)
Start with Light Blue yarn.
R1: 6 sc in MR (6)
R2: 6 inc (12)
R3: (1 sc, inc) x6 (18)
R4: (2 sc, inc) x6 (24)
R5-R6: Sc in each stitch around (2 rounds, 24 sts)
Change to Dark Purple yarn.
R7-R8: Sc in each stitch around (2 rounds, 24 sts)
Change to Light Blue yarn.
R9-R10: Sc in each stitch around (2 rounds, 24 sts)
Stuff firmly. FO, leaving a long tail for attaching.
Arms (Make 2 – Light Blue & Dark Purple Yarn)
Start with Light Blue yarn.
R1: 6 sc in MR (6)
R2-R3: Sc in each stitch around (2 rounds, 6 sts)
Change to Dark Purple yarn.
R4-R5: Sc in each stitch around (2 rounds, 6 sts)
Change to Light Blue yarn.
R6-R7: Sc in each stitch around (2 rounds, 6 sts)
Stuff lightly. FO, leaving a long tail for attaching.
Legs/Boots (Make 2 – Dark Blue Yarn)
R1: 6 sc in MR (6)
R2: 6 inc (12)
R3: Sc in each stitch around BLO (12)
R4-R6: Sc in each stitch around (3 rounds, 12 sts)
R7: (dec) x3, sc in next 6 stitches (9)
Stuff lightly. FO, leaving a long tail for attaching.
Skirt (Black Yarn)
Ch 18. Join with a sl st to form a ring.
R1: Ch 1, sc in each ch around. Join with sl st. (18 sc)
R2: Ch 1, (sc in next st, inc) x9. Join with sl st. (27 sc)
R3: Ch 1, sc in each stitch around. Join with sl st. (27 sc)
FO, leaving a long tail for attaching.
Straps & Belt (Dark Purple Yarn)
Chest Straps (Make 2): Ch 30. Sl st in 2nd ch from hook and in each ch across. FO.
Belt: Ch 18. Sl st in 2nd ch from hook and in each ch across. FO.
Assembly
1. Sew the Hood onto the Head.
2. Attach the Head to the Body.
3. Sew the Arms to the sides of the Body, just below the neck.
4. Sew the Legs/Boots to the bottom of the Body.
5. Slip the Skirt over the Body and secure it around the waist with a few stitches.
6. Take the two long Chest Straps. Cross them over the front of the Body in an ‘X’ shape, similar to the image, and sew them securely in place.
7. Wrap the shorter Belt strap around the waist, over the Skirt and the lower part of the chest straps, and sew in place.
8. Attach the keychain ring securely to the top of the Hood.