
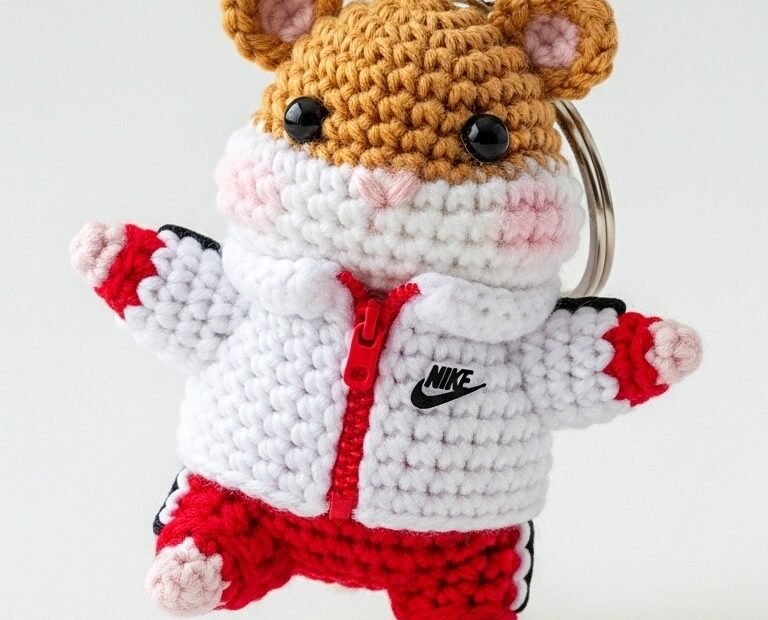
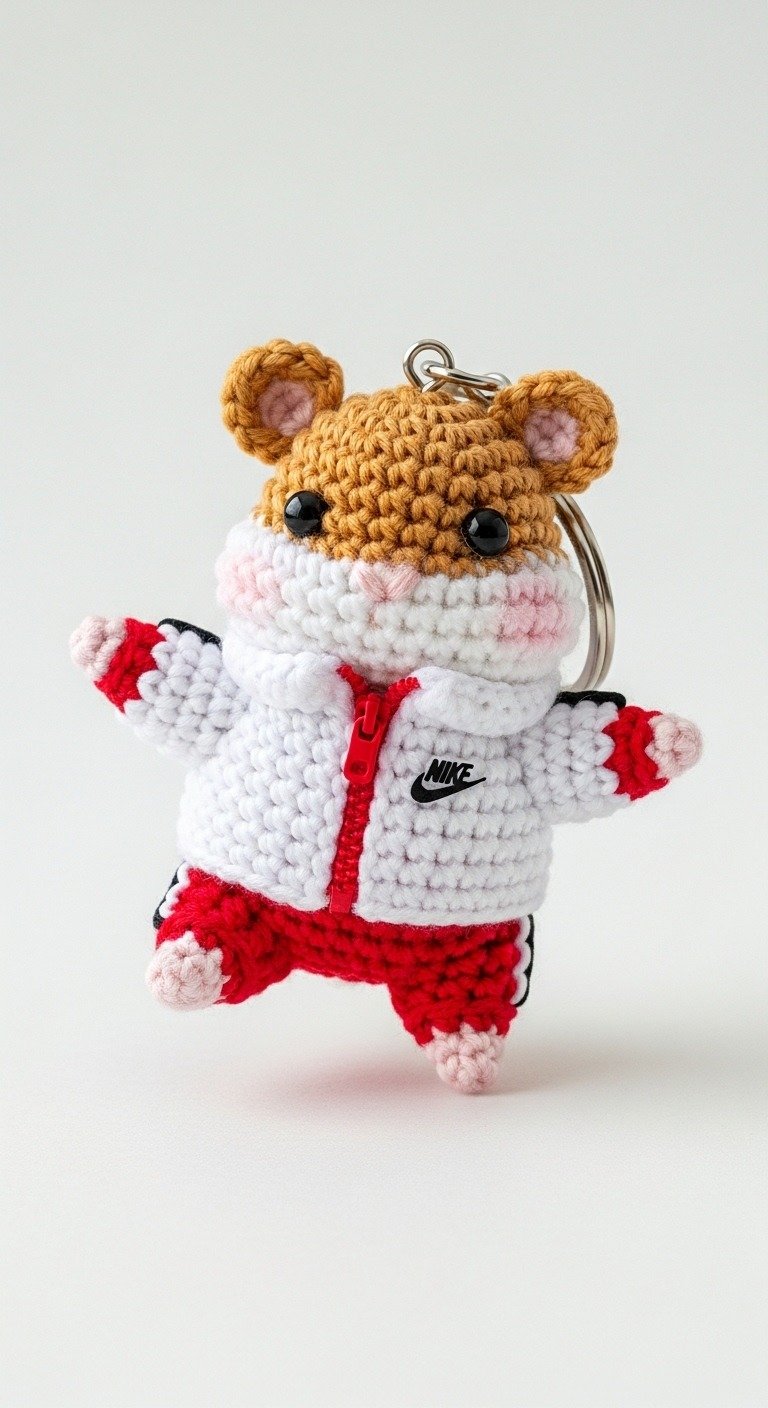
Get ready to hit the track with this adorable Sporty Hamster Amigurumi Keychain pattern! This little fellow, complete with a tiny tracksuit, is perfect for adding a touch of playful charm to your keys, bag, or backpack. A delightful project for amigurumi enthusiasts of all levels, promising a unique and eye-catching handmade accessory.
Craft a Champion: The Joy of a Personalized Amigurumi Keychain
There’s nothing quite like the satisfaction of creating something unique and handmade. This Sporty Hamster Keychain allows you to craft a charming companion that reflects your personality or makes a thoughtful, custom gift. Enjoy the process of bringing this tiny athlete to life, stitch by stitch, and carry a smile with you wherever you go!
Crochet Pattern: Run, Hamster, Run! Crochet Your Own Sporty Amigurumi Keychain with Tracksuit
Materials
- Worsted weight yarn in: Light Brown (for head/ears), White (for face/jacket), Red (for tracksuit), Black (for tracksuit stripes/logo), Light Pink (for inner ears/cheeks/paws)
- Crochet hook: 3.0mm (or size to achieve tight stitches)
- Safety eyes: 6mm black
- Polyester fiberfill
- Yarn needle
- Scissors
- Stitch markers
- Keychain ring
- Black embroidery floss (for Nike-style logo and mouth)
- Red embroidery floss (for zipper detail)
Abbreviations
- MR: Magic Ring
- ch: chain
- sl st: slip stitch
- sc: single crochet
- inc: increase (2 sc in one st)
- dec: decrease (sc2tog)
- BLO: back loop only
- FO: fasten off
- Rnd(s): Round(s)
- st(s): stitch(es)
Instructions
Head (Light Brown & White)
- Rnd 1: In Light Brown yarn, start with MR 6 sc. (6)
- Rnd 2: [inc] x 6. (12)
- Rnd 3: [sc, inc] x 6. (18)
- Rnd 4: [2 sc, inc] x 6. (24)
- Rnd 5: [3 sc, inc] x 6. (30)
- Rnd 6-8: Sc in each st around. (30)
- Rnd 9: [3 sc, dec] x 6. (24)
- Rnd 10: Change to White yarn. Sc in each st around. (24)
- Rnd 11: [2 sc, dec] x 6. (18)
- Insert safety eyes between Rnd 7 and 8, about 5 stitches apart. Stuff head firmly.
- Rnd 12: [sc, dec] x 6. (12)
- Rnd 13: [dec] x 6. (6)
- FO, weave in tail to close the hole. Embroider a small black nose and mouth onto the white part of the face. Using Light Pink yarn, embroider small blush circles on the cheeks.
Ears (Make 2) (Light Brown & Light Pink)
- Rnd 1: In Light Brown yarn, start with MR 4 sc. (4)
- Rnd 2: [sc, inc] x 2. (6)
- Rnd 3: Sc in each st around. (6)
- FO, leave a long tail for sewing. Flatten the ear. Using Light Pink yarn, embroider a small inner ear circle.
Body (White & Red)
- Rnd 1: In White yarn, start with MR 6 sc. (6)
- Rnd 2: [inc] x 6. (12)
- Rnd 3: [sc, inc] x 6. (18)
- Rnd 4: [2 sc, inc] x 6. (24)
- Rnd 5-8: Sc in each st around. (24)
- Rnd 9: Change to Red yarn. Sc in each st around. (24)
- Rnd 10-14: Sc in each st around. (24)
- Rnd 15: [2 sc, dec] x 6. (18)
- Start stuffing the body.
- Rnd 16: [sc, dec] x 6. (12)
- Rnd 17: [dec] x 6. (6)
- FO, leave a long tail for sewing. Finish stuffing.
Arms (Make 2) (Light Pink)
- Rnd 1: In Light Pink yarn, start with MR 6 sc. (6)
- Rnd 2-3: Sc in each st around. (6)
- FO, leave a long tail for sewing. Do not stuff.
Legs/Feet (Make 2) (Light Pink)
- Rnd 1: In Light Pink yarn, start with MR 6 sc. (6)
- Rnd 2-3: Sc in each st around. (6)
- FO, leave a long tail for sewing. Do not stuff.
Jacket (White, Red, Black)
- Start with White yarn. Ch 18.
- Row 1: Sc in 2nd ch from hook and across. (17) Ch 1, turn.
- Row 2-6: Sc in each st across. (17) Ch 1, turn.
- Row 7: [Sc in next 3 st, inc] x 4, sc in last st. (21) Ch 1, turn.
- Row 8: Sc in each st across. (21) Ch 1, turn.
- Row 9: [Sc in next 4 st, inc] x 4, sc in last st. (25) Ch 1, turn.
- Row 10: Sc in each st across. (25) Ch 1, turn.
- FO, weave in ends. This is the main body of the jacket.
- Jacket Hood (White):
- Ch 15.
- Row 1: Sc in 2nd ch from hook and across. (14) Ch 1, turn.
- Row 2-6: Sc in each st across. (14) Ch 1, turn.
- Fold the rectangle in half and sl st the top edge together to form the hood. Attach to the top of the jacket body.
- Jacket Sleeves (Make 2) (White, Red, Black):
- Rnd 1: In White yarn, start with MR 6 sc. (6)
- Rnd 2: [inc] x 6. (12)
- Rnd 3-5: Sc in each st around. (12)
- Rnd 6: Change to Red yarn. Sc in each st around. (12)
- Rnd 7: Change to Black yarn. Sc in each st around. (12)
- Rnd 8: Change to White yarn. Sc in each st around. (12)
- FO, leave a long tail for sewing. Stuff lightly.
Pants (Red & Black)
- Rnd 1: In Red yarn, ch 24, sl st to first ch to form a ring. (24)
- Rnd 2-6: Sc in each st around. (24)
- Rnd 7: Sc in first 12 st. Leave remaining 12 st unworked. This forms the first pant leg. (12)
- Rnd 8-10: Sc in each st around for first leg. (12) FO.
- Rejoin Red yarn to the unworked 12 st from Rnd 7.
- Rnd 8-10: Sc in each st around for second leg. (12) FO, leave a long tail for sewing.
- Pants Stripes (Black):
- Using Black yarn, embroider a vertical stripe down the side of each pant leg.
- Pants Cuffs (White):
- Attach White yarn to the bottom of each pant leg and sc around for 1-2 rounds to create a cuff. FO.
Assembly
- Sew the ears to the top of the head, slightly to the sides.
- Sew the head to the body.
- Sew the jacket body onto the hamster body, positioning the front opening at the center.
- Sew the jacket sleeves onto the sides of the jacket body. Insert the small pink arms into the sleeves and sew them securely in place so the pink tips just peek out.
- Stuff the pants lightly. Sew the pink feet into the bottom of each pant leg, ensuring the pink tips are visible.
- Sew the pant portion of the tracksuit onto the lower body.
- Details:
- Using black embroidery floss, carefully embroider the