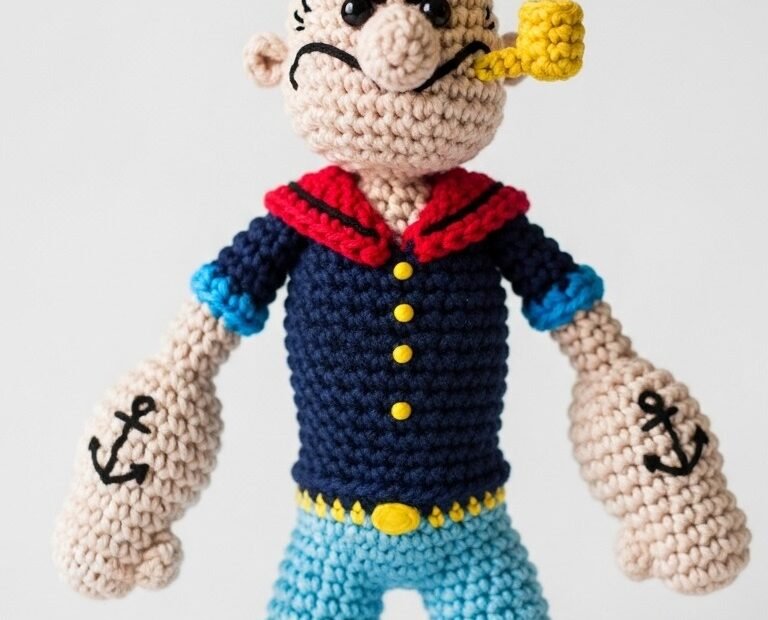
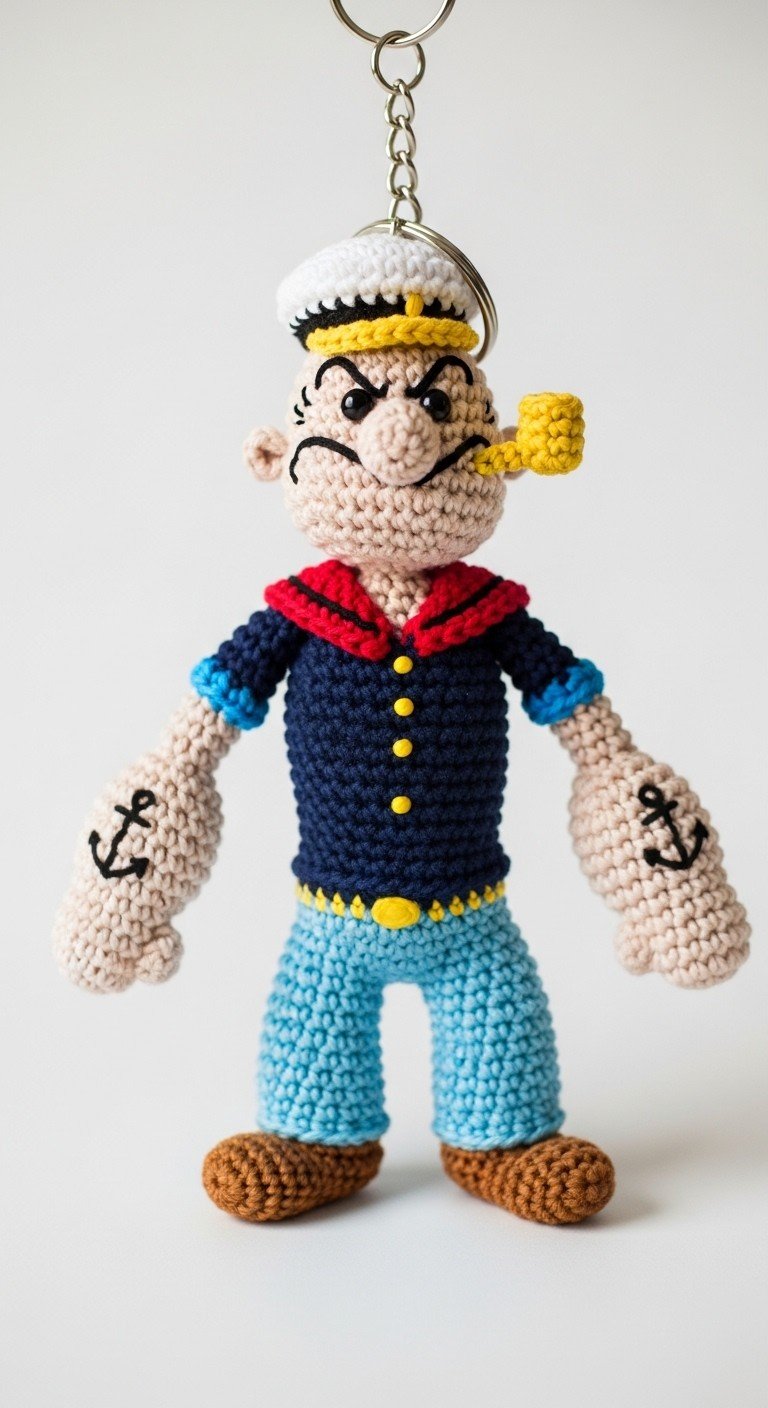
Ahoy, matey! Bring a timeless cartoon hero to life with our detailed crochet pattern for a Popeye the Sailor Amigurumi Keychain. This fun and feisty little character is perfect for fans of the classic sailor man, adding a touch of nostalgic charm to your keys, bag, or even as a unique gift. Get ready to flex your crochet muscles!
Unleash Your Inner Strength: Crafting a Cartoon Classic
There’s something truly special about crocheting a beloved character. This Popeye amigurumi not only celebrates a pop culture icon but also allows you to hone your skills while creating a tangible piece of art. Imagine the smiles this little sailor will bring to anyone who sees him, a testament to your crafty talent!
Crochet Pattern: Sail Away with Style: Crochet Your Own Popeye Amigurumi Keychain!
Materials
Worsted weight or DK yarn in: Light Beige (skin), Dark Blue (shirt), Red (collar), Light Blue (pants), Yellow (pipe, hat trim, belt buckle, buttons), White (hat), Black (hat band, embroidery), Brown (shoes)
Crochet hook (e.g., 2.5mm or 3.0mm, depending on yarn)
Polyester fiberfill for stuffing
Tapestry needle
Scissors
Keychain ring
Black embroidery floss (optional, for fine facial details and anchor tattoos)
Abbreviations
MR: Magic Ring
sc: Single Crochet
inc: Increase (2 sc in one stitch)
dec: Decrease (sc two stitches together)
sl st: Slip Stitch
ch: Chain
FO: Fasten Off
BLO: Back Loop Only
FLO: Front Loop Only
Instructions
Head (Light Beige yarn):
R1: 6 sc in MR (6)
R2: 6 inc (12)
R3: (sc, inc) x 6 (18)
R4: (2 sc, inc) x 6 (24)
R5: (3 sc, inc) x 6 (30)
R6-R10: 30 sc (5 rounds)
R11: (3 sc, dec) x 6 (24)
R12: (2 sc, dec) x 6 (18)
Start stuffing firmly.
R13: (sc, dec) x 6 (12)
R14: 6 dec (6)
FO, close the remaining hole with a tapestry needle.
Body (Dark Blue yarn):
R1: 6 sc in MR (6)
R2: 6 inc (12)
R3: (sc, inc) x 6 (18)
R4: (2 sc, inc) x 6 (24)
R5-R11: 24 sc (7 rounds)
FO, leaving a long tail for sewing. Do not stuff yet.
Pants (Light Blue yarn) – Make 2 legs, then join:
Leg 1:
R1: 6 sc in MR (6)
R2: 6 inc (12)
R3-R7: 12 sc (5 rounds)
FO Leg 1.
Leg 2:
R1: 6 sc in MR (6)
R2: 6 inc (12)
R3-R7: 12 sc (5 rounds)
Do NOT FO Leg 2. Ch 3.
Joining Legs to form Pants:
Insert hook into any stitch of Leg 1, sc. Work 12 sc around Leg 1.
Work 3 sc into the ch-3 space.
Work 12 sc around Leg 2.
Work 3 sc into the other side of the ch-3 space. (30 stitches total)
R8-R11: 30 sc (4 rounds)
FO, leaving a long tail for sewing. Stuff both legs.
Arms (Light Beige, Dark Blue, Light Blue yarn) – Make 2:
Start with Light Beige yarn.
R1: 6 sc in MR (6)
R2: (sc, inc) x 3 (9)
R3-R5: 9 sc (3 rounds)
Stuff hand lightly.
Change to Dark Blue yarn.
R6-R9: 9 sc (4 rounds)
Change to Light Blue yarn (for cuff).
R10: 9 sc (1 round)
FO, leaving a long tail for sewing. Do not stuff the arm section.
Shoes (Brown yarn) – Make 2:
R1: Ch 4, sc in 2nd ch from hook, sc in next ch, 3 sc in last ch. Work on the other side of the chain: sc, 2 sc in last st (8)
R2: Inc, sc, 3 inc, sc, 2 inc (14)
R3: 14 sc in BLO (14)
R4-R5: 14 sc (2 rounds)
Stuff lightly.
R6: (sc, dec) x 4, sc, dec (9)
FO, close the remaining hole.
Hat (White, Black, Yellow yarn):
Start with White yarn.
R1: 6 sc in MR (6)
R2: 6 inc (12)
R3: (sc, inc) x 6 (18)
R4: (2 sc, inc) x 6 (24)
R5: (3 sc, inc) x 6 (30)
R6-R8: 30 sc (3 rounds)
Change to Black yarn.
R9: 30 sc (1 round)
Change to Yellow yarn.
R10: 30 sc (1 round)
Change to White yarn.
R11: Working in FLO: (4 sc, inc) x 6 (36)
R12: 36 sc (1 round)
FO, leaving a long tail for sewing.
Collar (Red yarn):
Ch 15.
Row 1: Sc in 2nd ch from hook and in each remaining ch (14 sc). Ch 1, turn.
Row 2: Sc in each st across (14 sc).
FO, leaving a long tail for sewing.
Pipe (Yellow yarn):
Bowl:
R1: 4 sc in MR (4)
R2: (sc, inc) x 2 (6)
R3: 6 sc (1 round)
Sl st, FO.
Stem:
Ch 5. Sc in 2nd ch from hook and in the next 3 ch (4 sc).
FO, leaving a long tail.
Sew the stem to the bowl.
Assembly and Embroidery:
Sew the Head to the top of the Body.
Sew the Pants to the bottom of the Body. Stuff the entire body firmly.
Attach the Arms to the sides of the Body, just below the neck.
Sew the Shoes to the bottom of the Legs.
Embroider Popeye’s iconic facial features on the Head using black yarn or embroidery floss: angry eyebrows, eyes (small French knots or embroidered dots), a small nose, and a curved, determined mouth. Add a small vertical stitch for the chin crease.
Using black yarn or embroidery floss, embroider an anchor tattoo onto the outer side of each forearm.
Position the Red Collar around the neck, shaping it into a ‘V’ at the front, and sew it in place.
Embroider small yellow dots down the front of Popeye’s Dark Blue shirt for buttons.
Embroider a yellow oval shape for the belt buckle where the Dark Blue shirt meets the Light Blue pants.
Sew the Hat to the top of Popeye’s head.
Attach the Pipe to the side of Popeye’s mouth.
Finally, attach a keychain ring to the top of the hat to complete your Popeye Amigurumi Keychain!