
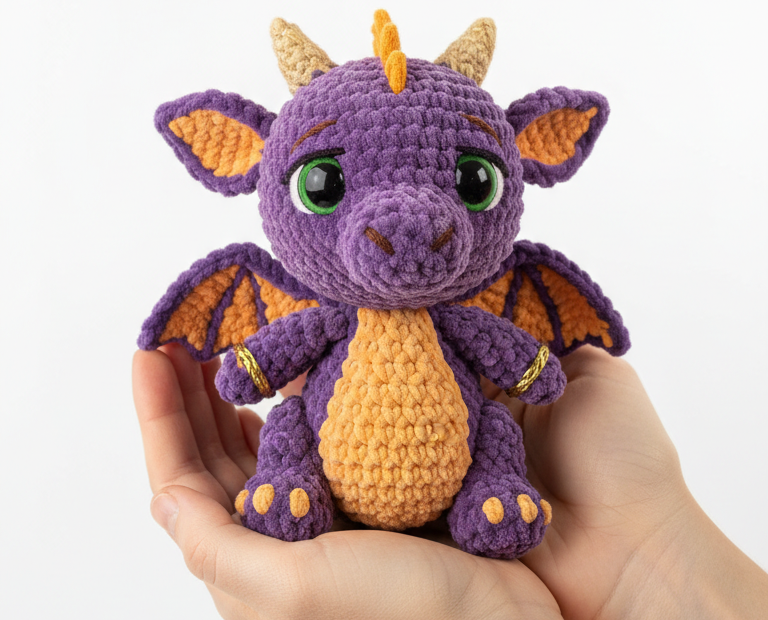
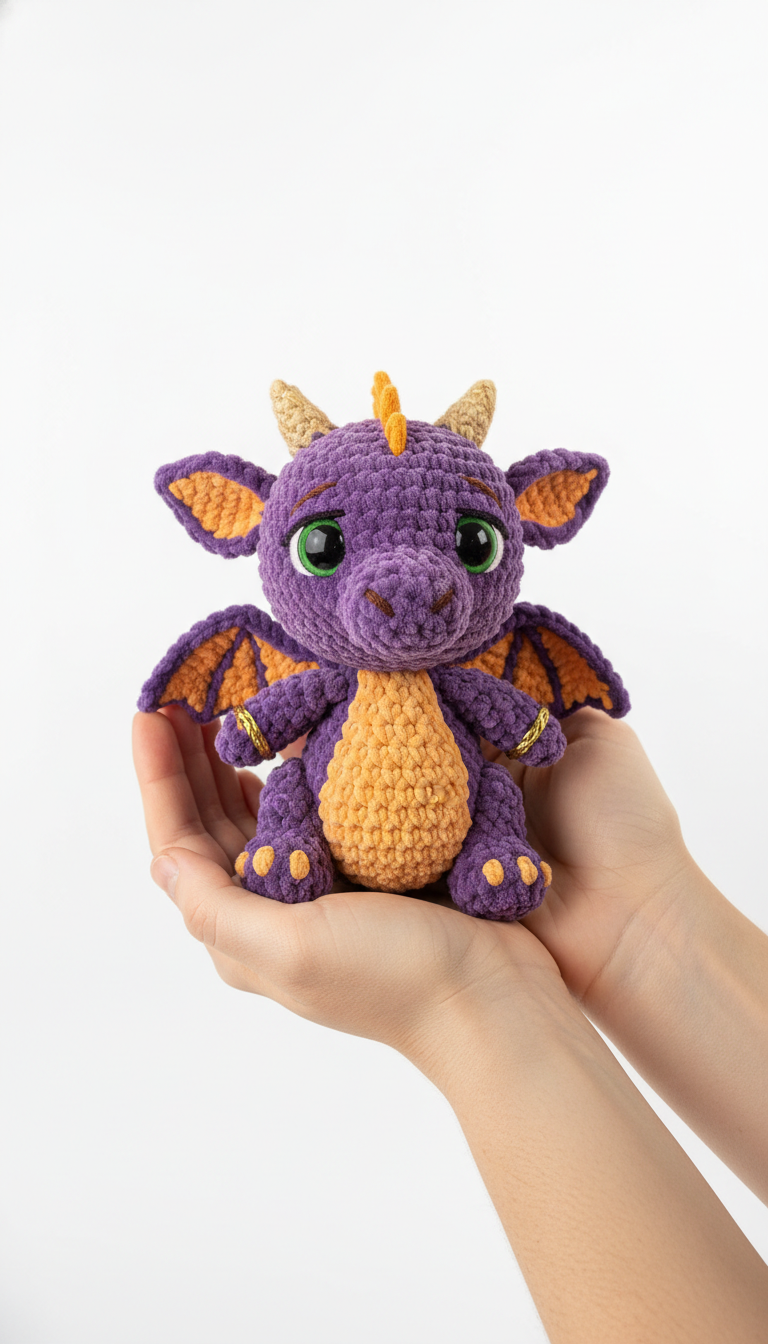
Ignite your creativity with Sparky, the most adorable little amigurumi dragon! This charming crochet pattern will guide you through creating a soft, huggable companion with vibrant purple and orange colors. Perfect for dragon lovers of all ages, Sparky features expressive eyes and cute little wings, making him an irresistible plushie.
Bring Your Own Adorable Dragon to Life!
There’s nothing quite like the joy of crafting a unique, handmade treasure. This detailed Amigurumi Dragon pattern offers a rewarding experience for crocheters of all levels, resulting in a whimsical stuffed animal that’s perfect for gifting or keeping as a cherished item. Follow our easy-to-understand instructions and watch your very own Sparky come to life!
Crochet Pattern: Sparky the Amigurumi Dragon: A Free Crochet Pattern for Your Cuddly Companion
Materials
- Chenille or Velvet Yarn in Purple (approx. 100g)
- Chenille or Velvet Yarn in Orange (approx. 50g)
- Worsted Weight Yarn in Light Tan (for horns, small amount)
- Worsted Weight Yarn in Black (for eye details/nostrils, small amount)
- Worsted Weight Yarn in Green (for eye whites, small amount)
- 5.0mm (H/8) Crochet Hook
- 15mm Green Safety Eyes with washers
- Polyester fiberfill for stuffing
- Tapestry needle
- Stitch markers
- Scissors
- Small gold rings (optional, for wrists)
Abbreviations
- MR: Magic Ring
- ch: chain
- sc: single crochet
- inc: increase (2 sc in one stitch)
- dec: decrease (sc two stitches together)
- sl st: slip stitch
- fo: fasten off
- st(s): stitch(es)
- rnd: round
- blo: back loop only
- hdc: half double crochet
Instructions
Gauge: Not critical for this project, just ensure your stitches are tight enough to prevent stuffing from showing through.
Notes: Work in continuous rounds unless otherwise specified. Use a stitch marker to mark the beginning of each round.
Head (Purple Yarn)
- Rnd 1: Start with MR, 6 sc (6)
- Rnd 2: 6 inc (12)
- Rnd 3: (1 sc, inc) x 6 (18)
- Rnd 4: (2 sc, inc) x 6 (24)
- Rnd 5: (3 sc, inc) x 6 (30)
- Rnd 6: (4 sc, inc) x 6 (36)
- Rnd 7-12: Sc in each st around (36) (6 rounds)
- Place safety eyes between Rnd 9 and 10, about 6 stitches apart. Embroider small green eye whites around the safety eyes and black pupils. Embroider small purple eyebrows above the eyes.
- Rnd 13: (4 sc, dec) x 6 (30)
- Rnd 14: (3 sc, dec) x 6 (24)
- Start stuffing the head firmly.
- Rnd 15: (2 sc, dec) x 6 (18)
- Rnd 16: (1 sc, dec) x 6 (12)
- Rnd 17: 6 dec (6)
- FO, weave in ends.
Snout (Purple Yarn)
- Rnd 1: Ch 5. Sc in 2nd ch from hook, 2 sc, 3 sc in last ch. Continue on other side of ch: 2 sc, 2 sc in last st (10)
- Rnd 2-3: Sc in each st around (10)
- Stuff lightly. Sl st, fo, leaving a long tail for sewing. Embroider two small black dots for nostrils on the front.
Body (Purple Yarn)
- Rnd 1: Start with MR, 6 sc (6)
- Rnd 2: 6 inc (12)
- Rnd 3: (1 sc, inc) x 6 (18)
- Rnd 4: (2 sc, inc) x 6 (24)
- Rnd 5: (3 sc, inc) x 6 (30)
- Rnd 6: (4 sc, inc) x 6 (36)
- Rnd 7: (5 sc, inc) x 6 (42)
- Rnd 8-16: Sc in each st around (42) (9 rounds)
- Rnd 17: (5 sc, dec) x 6 (36)
- Rnd 18: Sc in each st around (36)
- Start stuffing firmly.
- Rnd 19: (4 sc, dec) x 6 (30)
- Rnd 20: (3 sc, dec) x 6 (24)
- Rnd 21: (2 sc, dec) x 6 (18)
- Sl st, fo, leaving a long tail for sewing. Finish stuffing.
Belly Patch (Orange Yarn)
- Rnd 1: Ch 6. Sc in 2nd ch from hook, 3 sc, 3 sc in last ch. Continue on other side of ch: 3 sc, 2 sc in last st (12)
- Rnd 2: Inc, 3 sc, 3 inc, 3 sc, 2 inc (18)
- Rnd 3: (1 sc, inc), 3 sc, (1 sc, inc) x 3, 3 sc, (1 sc, inc) x 2 (24)
- Sl st, fo, leaving a long tail for sewing.
Ears (Make 2 – Orange & Purple Yarn)
- Inner Ear (Orange):
- Row 1: Ch 5. Sc in 2nd ch from hook, 3 sc (4). Ch 1, turn.
- Row 2: Dec, sc, dec (3). Ch 1, turn.
- Row 3: Sc in middle st (1). Fo.
- Outer Ear (Purple): With purple yarn, single crochet evenly around the edge of the orange inner ear piece. Sl st to join, fo, leaving a long tail for sewing. Slightly pinch the bottom center of the ear when sewing to give it shape.
Horns (Make 2 – Light Tan Yarn)
- Rnd 1: Start with MR, 4 sc (4)
- Rnd 2: (1 sc, inc) x 2 (6)
- Rnd 3-4: Sc in each st around (6) (2 rounds)
- Sl st, fo, leaving a long tail for sewing. Stuff lightly.
Spikes (Make 3-5 – Orange Yarn)
- Row 1: Ch 4. Sc in 2nd ch from hook, hdc, dc (3). Fo, leaving a tail for sewing.
- Make multiple of these small triangles.
Wings (Make 2 – Orange & Purple Yarn)
- Inner Wing (Orange):
- Row 1: Ch 12. Sc in 2nd ch from hook, 10 sc (11). Ch 1, turn.
- Row 2: 11 sc. Ch 1, turn.
- Row 3: Dec, 7 sc, dec (9). Ch 1, turn.
- Row 4: 9 sc. Ch 1, turn.
- Row 5: Dec, 5 sc, dec (7). Ch 1, turn.
- Row 6: 7 sc. Ch 1, turn.
- Row 7: Dec, 3 sc, dec (5). Ch 1, turn.
- Row 8: 5 sc. Ch 1, turn.
- Row 9: Dec, sc, dec (3). Ch 1, turn.
- Row 10: 3 sc. Ch 1, turn.
- Row 11: Sc, dec (2). Ch 1, turn. (Dec is last 2 sts)
- Row 12: Dec (1). Fo.
- Outer Wing (Purple): With purple yarn, single crochet evenly around the entire edge of the orange wing piece. Using surface crochet or by stitching through previous rows, create the ‘vein’ details on the wing as seen in the image. Fo, leaving a long tail for sewing.
Arms (Make 2 – Purple Yarn)
- Rnd 1: Start with MR, 5 sc (5)
- Rnd 2: 5 inc (10)
- Rnd 3-6: Sc in each st around (10) (4 rounds)
- Stuff lightly. Sl st, fo, leaving a long tail for sewing. Embroider small orange paw pads on the bottom. If using, slide on a gold ring to one arm before attaching.
Legs (Make 2 – Purple Yarn)
- Rnd 1: Start with MR, 6 sc (6)
- Rnd 2: 6 inc (12)
- Rnd 3-7: Sc in each st around (12) (5 rounds)
- Stuff lightly. Sl st, fo, leaving a long tail for sewing. Embroider small orange paw pads on the bottom.
Assembly
- Sew the head to the top opening of the body, centering it neatly.
- Sew the snout onto the front of the head, just below the eyes.
- Attach the ears to the top sides of the head, slightly behind the eyes.
- Sew the horns on top of the head, between the ears.
- Sew the orange spikes along the back of the head/neck, evenly spaced.
- Sew the orange belly patch onto the front of the body, centering it.
- Attach the arms to the sides of the body, slightly below the neck seam.
- Attach the legs to the bottom of the body, ensuring the dragon sits upright.
- Weave in all remaining loose ends.