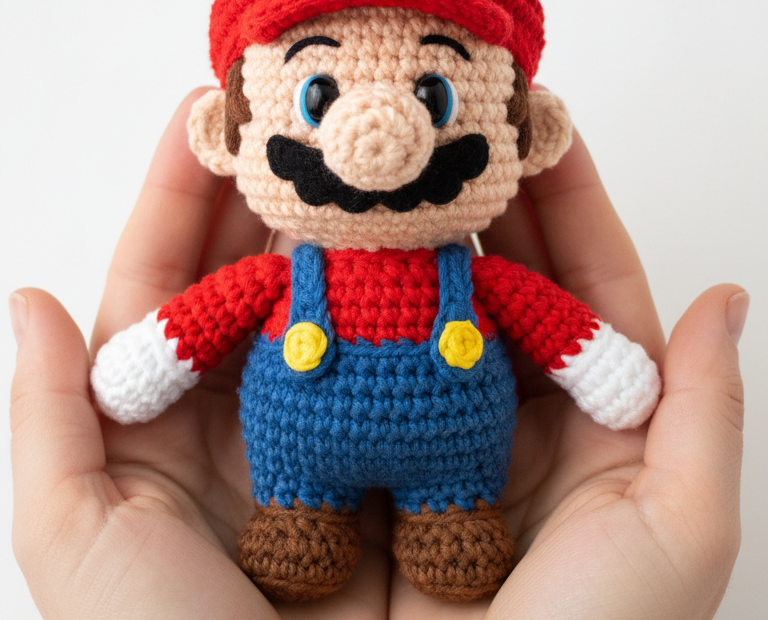
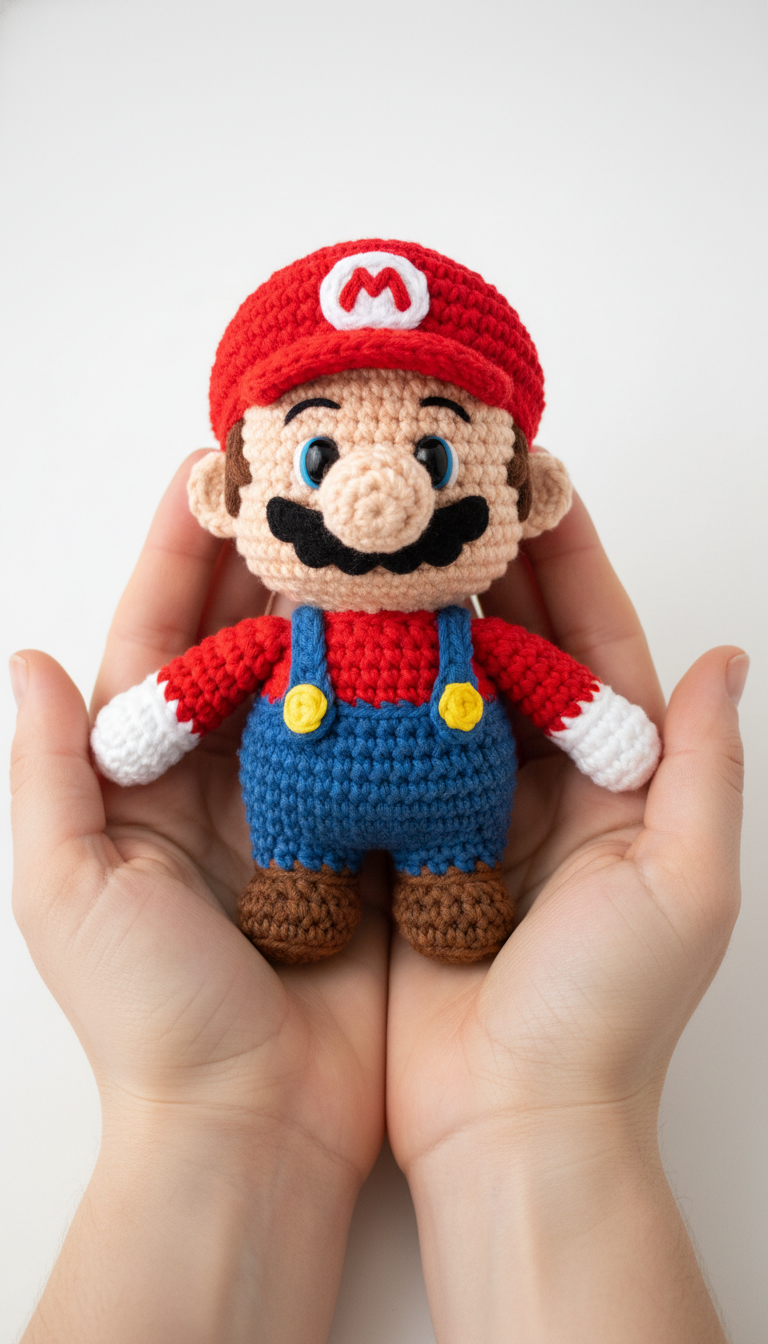
Embark on a nostalgic crafting journey with this Super Mario Amigurumi Crochet Pattern! Perfect for fans of the classic Nintendo hero, this detailed guide will help you create your very own lovable Mario doll. Whether for play, display, or a heartfelt gift, bringing this pixelated icon to life with yarn is a truly rewarding experience.
Level Up Your Crochet Skills: Crafting the Legendary Mario
This pattern isn’t just about making a toy; it’s about celebrating a beloved character while honing your amigurumi techniques. Each stitch brings Mario’s signature look to life, from his iconic red cap to his trusty blue overalls. Imagine the joy of holding your handmade Super Mario, a testament to your creativity and passion for both crochet and gaming.
Crochet Pattern: Super Mario Amigurumi Crochet Pattern: Craft Your Own Iconic Plumber!
Materials
Worsted weight yarn in Red, Blue, Beige (skin tone), Brown, White, Yellow, Black (for embroidery)
Crochet Hook: 3.0mm
Safety Eyes: 6mm, Blue
Stuffing: Polyester fiberfill
Yarn Needle
Stitch Markers
Scissors
Abbreviations
MR: Magic Ring
ch: chain
sc: single crochet
inc: increase (2 sc in next stitch)
dec: decrease (sc2tog)
sl st: slip stitch
FO: Fasten off
(): Repeat instructions in parentheses for the specified number of times
[]: Total number of stitches in the round
Instructions
Notes: This pattern uses US crochet terms. Work in continuous rounds unless otherwise specified. Use a stitch marker to keep track of your first stitch in each round. Stuff as you go.
Head (Beige yarn):
R1: 6 sc in MR [6]
R2: (inc) x 6 [12]
R3: (sc, inc) x 6 [18]
R4: (2 sc, inc) x 6 [24]
R5: (3 sc, inc) x 6 [30]
R6: (4 sc, inc) x 6 [36]
R7-R12: sc around (6 rounds) [36]
Insert safety eyes between R9 and R10, about 6-7 stitches apart.
R13: (4 sc, dec) x 6 [30]
R14: (3 sc, dec) x 6 [24]
Stuff firmly.
R15: (2 sc, dec) x 6 [18]
R16: (sc, dec) x 6 [12]
R17: (dec) x 6 [6]
FO, weave in tail.
Nose (Beige yarn):
R1: 6 sc in MR [6]
R2: (inc) x 6 [12]
R3: sc around [12]
R4: (dec) x 6 [6]
Stuff lightly. FO, leave long tail for sewing.
Ears (Make 2, Beige yarn):
R1: 6 sc in MR [6]
R2: sc around [6]
FO, leave long tail for sewing. Flatten.
Cap (Red yarn):
R1: 6 sc in MR [6]
R2: (inc) x 6 [12]
R3: (sc, inc) x 6 [18]
R4: (2 sc, inc) x 6 [24]
R5: (3 sc, inc) x 6 [30]
R6: (4 sc, inc) x 6 [36]
R7-R11: sc around (5 rounds) [36]
Brim: Ch 1, turn, 18 sc. (Work back and forth for the brim).
R13: Ch 1, turn, (sc, inc) x 6 [24]
R14: Ch 1, turn, sc around [24]
FO, leave long tail for sewing.
White ‘M’ Disc: (White yarn) R1: 6 sc in MR [6]. R2: (inc) x 6 [12]. FO. Embroider red ‘M’ onto white disc. Sew to cap.
Body (Red and Blue yarn):
Start with Red yarn.
R1: 6 sc in MR [6]
R2: (inc) x 6 [12]
R3: (sc, inc) x 6 [18]
R4: (2 sc, inc) x 6 [24]
R5-R9: sc around (5 rounds) [24]
Change to Blue yarn for overalls.
R10-R14: sc around (5 rounds) [24]
Stuff firmly.
FO, leave tail for sewing to head.
Arms (Make 2, Red and White yarn):
Start with Red yarn.
R1: 6 sc in MR [6]
R2-R3: sc around (2 rounds) [6]
Change to White yarn.
R4-R6: sc around (3 rounds) [6]
Stuff lightly. FO, leave long tail for sewing.
Legs/Boots (Make 2, Brown and Blue yarn):
Start with Brown yarn (Boots).
R1: 6 sc in MR [6]
R2: (inc) x 6 [12]
R3: sc around [12]
R4: (dec) x 6 [6]
Stuff boot part.
Change to Blue yarn (Legs).
R5-R9: sc around (5 rounds) [6]
Stuff lightly. FO, leave long tail for sewing.
Overalls Straps (Make 2, Blue yarn):
Ch 12, sl st in 2nd ch from hook and across. FO, leave long tails for sewing.
Buttons (Make 2, Yellow yarn):
R1: 6 sc in MR [6]
FO, leave long tail for sewing.
Assembly:
Sew head to body securely.
Sew nose centered on the head, just above where the moustache will be.
Embroider small brown eyebrows above the safety eyes using a yarn needle.
Embroider a prominent black moustache below the nose.
Sew ears to the sides of the head, positioning them partially under the cap.
Sew the cap to the top of the head, tilting it slightly as seen in the image.
Sew arms to the sides of the body, just below the red shirt part, symmetrically.
Sew legs to the bottom of the blue body part, ensuring they allow the figure to stand or sit.
Sew the blue overall straps from the front of the blue body (near the neck area) to the back, criss-crossing them.
Sew yellow buttons to the front of the blue overalls where the straps attach.
If desired, add a small amount of brown yarn under the cap at the back for a hint of hair.